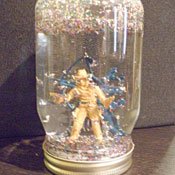
So, you already have a snow globe from every state, plus Guam and Puerto Rico? Then, get creative and make your own original shakers.
Materials
• Clean glass jar with lid (mason jars and baby food jars work well)
• Plastic toy or figurine (small enough to fit in the jar you're using)
• Glitter • Water
• Hot glue gun
• Liquid glycerin (optional)
Step 1
Wash and dry the jar and lid. To test that the lid provides a watertight seal, fill the jar up with water and turn it upside in an empty bowl. If there is no water in the bowl after an hour, then your jar is good to go.
Step 2
Remove the lid from the jar and set jar aside. Turn the lid upside down and glue the toy or figurine to the inside of the lid. Let the lid dry overnight. For a more decorative snow globe, consider spray painting the lid and letting it dry overnight. An adult should operate the glue gun. Children can place the toy in the glue; this applies for steps five and six.
When choosing your toy or figurine, make sure it is waterproof and won't dissolve or rust. N.U.T.S. (114 Millsaps Ave., 601-355-7458) has tons of kitschy miniature toys.
If your toy or figurine is small, consider building a platform for it to stand on. The platform can be made of foam, cork, rocks or any other waterproof material. We used foam.
Step 3
The next day, fill the jar with water. Make sure to leave room for the water level to rise when the toy is added.
Step 4
Add glitter to the water. If you are using a smaller jar, like a baby food jar, use one teaspoon of glitter. If you are using a larger jar, like a mason jar, use one or two tablespoons of glitter. For the traditional snowflake effect, use silver, white or light blue glitter. For a more creative globe, choose any color glitter: pink, green, gold, red or multi-colored.
To get your glitter to fall slowly, add a few drops of glycerin to the water. You can find glycerin at your local drugstore.
Step 5
Add hot glue to the inside rim of the lid. Then immediately put the lid on the jar. Screw the lid on tight and secure.
Be careful: Hot glue may ooze from the under the lid.
Step 6
Add a thin bead of glue around the outside of the jar--֖where the lid and jar meet. This will provide an extra seal from water leaking. Let dry for a few hours, lid side up.
Step 7
Once the glue is dry, invert your snow globe and shake, shake, shake!
OPTIONS:
To embellish your globe, tie a decorative ribbon or some other creative cord around the lid. This is a great touch if you are giving the globe away as a gift.
Considering using a large jar with a wide lid. You can create a more elaborate scene using plastic trees, houses, cars, etc.
Snow globes are not just for the holidays; you can make them throughout the year. Make a beach-themed globe in the summer, a cupid globe for Valentine's Day, or a bats and ghosts globe for Halloween. This is also a great excuse to experiment with different colored glitter.


Comments
Use the comment form below to begin a discussion about this content.
comments powered by Disqus