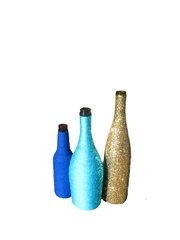
I don't know about the rest of the world, but I find crafting goes best with wine. A glass of Pinot is the perfect thing to get my creative juices going. Even better, when the wine is gone, there are countless ways to upcycle wine bottles to create funky, bold and textural art pieces. My current favorites are covering the bottles with colored yarn or glitter—I even used bottles like these as inexpensive, eye-catching table decorations for my wedding.
To begin, clean your bottles well, soaking off the labels. I find that if water alone doesn't work, a good glass cleaner can usually get the label off—it doesn't have to be completely perfect because you will be covering it, but just clean enough so the glue adheres to the glass rather than the label.
Materials:
- empty bottles
- Mod Podge or other glue
- paintbrush
- yarn
- glitter
- patience
I'll warn you, the yarn method requires a good amount of patience and care to turn out well, but it's worth it. My advice is to grab a friend or pop in a good movie while you work on it.
Start by painting a swath of glue about a half inch long along the bottom edge of the bottle, and then lay the yarn down on the glue, following the line of the bottom rim. Hold the yarn there until the glue dries—this is important because if the first line isn't stable, it will be difficult to keep the yarn on straight. Once it's dry, paint more glue along the bottom of the bottle, and slowly wind the yarn around, following the rim, starting a second line on top of the first. I recommend letting the first couple lines dry well, again to create a strong base.
Then, it is just a matter of painting a band of glue around the bottle an inch or so at a time and winding the yarn around, setting each line on top of the one before. The neck of the bottle can be tricky, so go slow and push each line of yarn down onto the one below if needed.
If you don't have the patience to wind yarn, the glitter method is for you. It involves two simple steps: 1. Apply glue liberally to bottle. 2. Douse in glitter. I find doing it in two halves is the easiest way. This one tends to make a mess, so do it in the bathroom or put paper down to protect your floor or rug.
The finished product is perfect for holding a flower or two, flanking a mantle or adding visual interest to a bookcase. I like to mix it up with the sizes and shapes of the bottles; beer or soda bottles make great smaller versions. Or try jars of various sizes—perfect for corralling pens, toothbrushes or whatever else.
Try this DIY! Send photos to [email protected] to be included in a gallery of reader projects.
Do you have a great DIY project to share with the JFP? Email [email protected]. The best submission will win a prize!


Comments